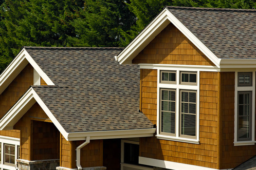
The Shingle Master is designed for easy installation and operation with a smooth, continuous, clean, and dry process depending on the roof deck. The roof deck can be constructed with materials such as OSB, plywood, cement, fiberboard, or a lightweight silica layer on top of the concrete deck.

:Marking on the roof
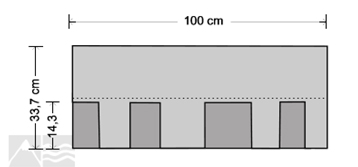
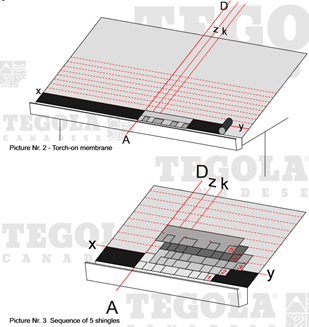
To mark the roof, follow these steps: draw an xy line perpendicular to the maximum slope of the roof, usually parallel to the lines of the counter and ladder, and 33 cm from the roof. Mark center point A along the xy-line. Draw points B and C on either side of point A, for example, at 150 cm. Find point D closest to the vertex using the distance between B and C with a chalk line as a ruler. Draw the line AD. Two parallel lines were drawn to line AD: one at 16.6 cm (Z) and the other at 33.3 cm (K). Finally, starting from the xy line, horizontal lines are parallel to it at a distance of 14.3 cm from each other up to the vertex line.
:Installation
To begin the installation, a 25 cm burner membrane was placed at the roof edge (as shown in Figure 2). Then, install the first row of shingles along the AD line (picture 2)
This is followed by the second row along the Z line (picture #3), the third row along the K line (picture 3), and the fourth row along the Z line (picture 3).
The fourth row was installed along the AD line (Figure 3).
This process was repeated until installation was complete. Throughout the installation, make sure to turn and level the shingles until they reach the upper edge.
:Slope
Shingles with nails require a minimum slope of 35% (equivalent to 20 °).
Fixing with nails:
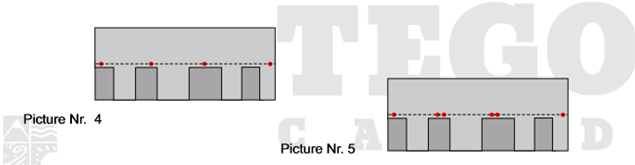
For roofing, it is recommended to use large head nails with high stability that are zinc coated or galvanized. The length of the nails should be appropriate for the thickness and type of the roof deck. Each MASTER sheet was secured with four nails, as illustrated in Figure 4. It is important to ensure that the nails are placed in the bituminous sub-spring of the next sheet. Note that for slopes exceeding 160% (60 °), six nails should be used on each sheet, and this is indicated in the second and third positions from the left in Figure 5.
:sharp
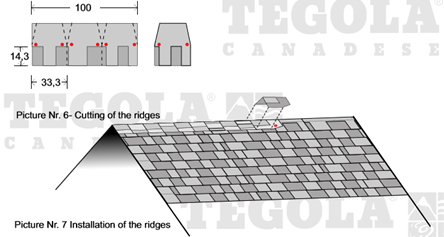
To prevent water from accumulating, install the final row of shingles up to the ridge line, and fold the overhang. The sheet stripes were cut into three pieces to create stripes (as shown in Figure 6) and carefully bent and positioned along the line before installation (Figure 7). If required, the stripes were heated on the sandside before installation. Overlap the piece below and secure the pieces with two nails each when installing the stripes (as shown in Fig. 8).
:Valley
For the perimeter line, an isogam sheet with a width of 100 cm was used. The coverage of one side of the roof should be extended by 25 cm beyond the boundary line, while the belt on the other side should be cut in the middle of the valley. After completing the installation of the second step, mark the centerline of the valley using a chalk line and trim off the surplus sheet. Finally, it was sealed with a bitustick. Avoid using nails in the valley region that measure less than 40 cm (image #8).
:the details
TEGOLA CANADESE offers various options for completing roof details, such as connections, valleys, and chimneys, including copper, colored metal sheets, and bituminous membranes. These products were designed to simplify installation and ensure quality results. Additionally, TEGOLA CANADESE provides a range of roof accessories, such as windows, snow curtains, and visors, to make the installation process even easier. The self-adhesive master shingles were designed to stick together firmly and withstand windy and swampy conditions. However, to prevent lifting during colder or damp weather, it is recommended to heat the adhesive points with a torch and press the belt down to ensure a secure bond.